安装gitlab runner

  1. curl -L "https://packages.gitlab.com/install/repositories/runner/gitlab-runner/script.rpm.sh" | sudo bash

  2. sudo yum install gitlab-runner

  3. sudo gitlab-runner register

gitlab runner root权限

  1. sudo gitlab-runner uninstall # 删除gitlab-runner

  2. gitlab-runner install --working-directory /home/gitlab-runner --user root # 安装并设置—user(设置为root)

  3. sudo service gitlab-runner restart # 重启gitlab-runner

  4. ps aux|grep gitlab-runner # 查看当前runner用户

小知识

记录编程路上的一些盲区知识点,方便后续直接拿来使用

正则 - 不匹配某些单词

  • /node_modules\/(?!@babel\/core)/

不匹配node_modules/@babel/core

匹配node_modules/@babel/preset-env

  • /node_modules\/(?!@babel\/core\/)/

优化版本 匹配node_modules/@babel/cores/

我们可以通过此正则,设置 webpack 的 loader,是否取特定处理某个在 node_modules 里面的库,对其进行编译

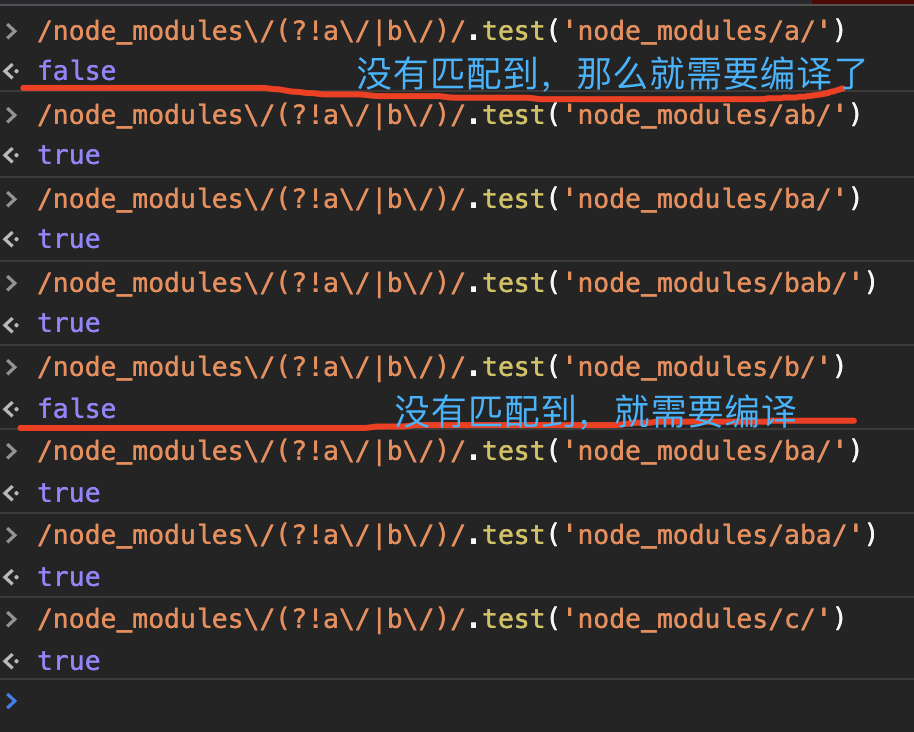
比如,我们需要忽略 node_modules,但是除了文件目录node_modules/a/node_modules/b/,即需要对这两个库,在编译时进行处理,不做忽略

可以设置如下正则:/node_modules\/(?!a\/|b\/)/

查看测试结果

nginx 配置单页路由

当访问任何一个以test.com/test开头的地址,都会指向/srv/static/test/build/index.html这个文件

解决了在单页应用时,路由跳转,页面刷新出现 404 的错误情况

1
2
3
4
5
6
7
8
9
server {
listen 80;
server_name test.com;

location ^~ /test {
alias /srv/static/test/build/;
try_files $uri /test/index.html;
}
}

go 语言,整形 string 转[]byte

给定10,12,13,14,1,2,3 转为 []byte{10,12,13,14,1,2,3}

1
2
3
4
5
6
7
8
9
10
11
12
13
14
15
16
17
18
19
20
21
22
23
24
25
26
27
28
29
30
31
// 直接看代码
package main

import (
"fmt"
"strconv"
)

const a = `10,12,13,14,1,2,3`

func main() {

d := []byte{}

if len(a) != 0 {
lv := ""
for _, v := range a {
if v == 44 {
s, _ := strconv.Atoi(lv)
d = append(d, uint8(s))
lv = ""
continue
}
lv = lv + string(v)
}
s, _ := strconv.Atoi(lv)
d = append(d, uint8(s))
}

fmt.Println(d)
}

部署 pgadmin

1
docker run --name pgadmin -p 5080:80  -e 'PGADMIN_DEFAULT_EMAIL=topthinking@test.com' -e 'PGADMIN_DEFAULT_PASSWORD=123456' -e 'PGADMIN_CONFIG_ENHANCED_COOKIE_PROTECTION=True' -e 'PGADMIN_CONFIG_LOGIN_BANNER="Authorised users only!"' -e 'PGADMIN_CONFIG_CONSOLE_LOG_LEVEL=10' -d dpage/pgadmin4:latest

docker 镜像加速

正则匹配所有字符串(包括换行)

1
const match = content.match(/<body>([\d\D]*)<\/body>/);

webpack细节

概念

module、chunk、bundle

  • module:就是 js 的模块化 webpack 支持 CommonJS、ES6 等模块化规范,简单来说就是你通过 import 语句引入的代码

  • chunk:是 webpack 根据功能拆分出来的,包含三种情况:

    • 你的项目入口(entry)
    • 通过import()动态引入的代码
    • 通过splitChunks拆分出来的代码

chunk 包含 module,可能是一对多,也可能是一对一

  • bundle:是 webpack 打包之后的各个文件,一般就是和 chunk 是一对一的关系,bundle 就是对 chunk 进行编译压缩打包等处理之后的产物

Webpack 之 SplitChunks 插件用法详解:https://zhuanlan.zhihu.com/p/152097785

在iframe里面使用react-router

说明

iframe 里面嵌入一个基于 HTML5 history 的现代网站,如果需要调用最顶层的浏览器路由(即路由地址体现在地址栏,而不是在 iframe 内的沙箱中)

那么该嵌入的代码就需要添加如下逻辑,去调用父容器的浏览器地址逻辑,这样页面的路由切换也将在浏览器的地址栏有所展示

否则,在 iframe 嵌入单页应用的页面时,在单页路由切换时,浏览器的地址栏不会发生任何变化,会导致页面刷新后,无法正常定位网页内容

实现代码

1
2
3
4
5
6
7
8
9
10
11
12
13
14
15
16
17
18
19
20
21
22
23
24
25
26
27
28
29
30
31
32
33
34
35
36
37
38
39
40
41
42
43
44
45
46
47
48
49
50
51
52
53
54
55
56
import { history as RouterHistory } from "award-router";
import { createLocation } from "history";

function hasBasename(path, prefix) {
return (
path.toLowerCase().indexOf(prefix.toLowerCase()) === 0 &&
"/?#".indexOf(path.charAt(prefix.length)) !== -1
);
}

function stripBasename(path, prefix) {
return hasBasename(path, prefix) ? path.substr(prefix.length) : path;
}

/**
* 路由系统全部交给parent管理
*/
let parentHistory = window.parent.history;
let localReplaceState = history.replaceState;
history.pushState = function () {
// console.log('pushState', arguments);
if (arguments[0] && arguments[0].state === "null") {
return;
}
parentHistory.pushState.apply(parentHistory, arguments);
localReplaceState.apply(history, arguments);
};
history.replaceState = function () {
// console.log('replaceState', arguments);
parentHistory.replaceState.apply(parentHistory, arguments);
localReplaceState.apply(history, arguments);
};
window.parent.addEventListener("popstate", function (e) {
// 这里其实路由已经发生变化了,只是react-router的组件没有按照正确的渲染,这里就是要让他进行渲染
let _ref = e.state || {};
let key = _ref.key;
let state = _ref.state;

let _window$location = window.parent.location;
let pathname = _window$location.pathname;
let search = _window$location.search;
let hash = _window$location.hash;
let path = pathname + search + hash;
path = stripBasename(path, "/gatekeeper/lego");
const location = createLocation(path, state, key);
localReplaceState.apply(history, [
"",
"",
location.pathname + location.search,
]);
RouterHistory.push({
pathname: location.pathname,
search: location.search,
state: "null",
});
});

职业闲谈

硬实力

  • 数据结构和算法(leetcode)
  • 设计模式
  • 前端 MDN 文档
  • react 源码(diff 算法、调度算法等)
  • nodejs 底层执行逻辑(v8)
  • 云技术(docker,k8s,serverless)
  • 3D 技术(VR、AR)
  • webassembly(go、rust 等底层语言)
  • 研究面向 5G 的商用技术

软实力

  • 思考问题的方式,多场景换位思考
  • 商业价值和技术变现
  • 英语

基于koa,自定义简单的MVC项目结构

定义路由实例,提供统一管理路由的工厂函数

1
2
3
4
5
6
7
8
9
10
11
12
13
14
15
16
17
18
19
20
21
22
23
24
25
26
27
28
29
30
31
32
33
34
35
36
37
38
39
40
41
42
43
44
45
46
47
48
49
50
// 定义MyRouter实例
import * as Router from 'koa-router';
import * as Koa from 'koa';
import * as compose from 'koa-compose';

class MyRouter<T> {
private routes: Router<Koa.Context, T>[] = [];
public export: Koa.Middleware;

public get: Router<Koa.Context, T>['get'];
public post: Router<Koa.Context, T>['post'];
public delete: Router<Koa.Context, T>['delete'];
public put: Router<Koa.Context, T>['put'];
public link: Router<Koa.Context, T>['link'];
public unlink: Router<Koa.Context, T>['unlink'];
public patch: Router<Koa.Context, T>['patch'];
public all: Router<Koa.Context, T>['all'];

public constructor() {
const router = new Router<Koa.Context, T>();
this.routes.push(router);

this.get = router.get.bind(router);
this.post = router.post.bind(router);
this.delete = router.delete.bind(router);
this.put = router.put.bind(router);
this.link = router.link.bind(router);
this.unlink = router.unlink.bind(router);
this.patch = router.patch.bind(router);
this.all = router.all.bind(router);

Object.defineProperty(this, 'export', {
get() {
const result: any[] = [];
this.routes.forEach((route: Router) => {
result.push(route.routes(), route.allowedMethods());
});
return compose(result);
}
});
}

public prefix(str: string) {
const router = new Router<Koa.Context, T>({ prefix: str });
this.routes.push(router);
return router;
}
}

export default MyRouter;

定义扩展的Context的TypeScript类型描述

1
2
3
4
5
6
7
8
9
10
11
12
13
14
15
16
17
18
19
20
21
// types
import * as Router from 'koa-router';
import * as Koa from 'koa';
import 'koa-body';
import { Connection } from 'mongoose';
import { Sequelize } from 'sequelize';
import { Redis } from 'ioredis';

// 这个类型,提供给实例化工厂路由使用
export interface ExtraContext {
mongodb: Connection;
mysql: Sequelize;
redis: Redis;
currentTime: number;
session: {
uid: number;
};
}

// 这个类型提供给控制器使用
export type Ctr = Router.IMiddleware<Koa.Context, ExtraContext>;

定义控制器,编写核心业务代码

一般创建文件夹controllers/user/index.js

1
2
3
4
export const getUserInfo: Ctr = async (ctx) => {
// 处理业务逻辑
ctx.body = { ret: 0, data: {} };
}

定义路由,提供统一管理能力

一般直接创建routes.js即可,您也只需一个路由定义文件即可,便于对于路由的统一管理

1
2
3
4
5
6
7
8
9
10
11
12
13
import * as UserCtr from './controllers/user';

const router = new MyRouter<ExtraContext>();

router
.prefix('/api/user')
.get('/info', UserCtr.getUserInfo);

router
.prefix('/api/project')
.get('/detail',ProjectCtr.getProjectDetail)

export default router.export

代码人生

经过我多年的开发经验,对于所有程序语言的学习,我觉得无非都要经过如下三个阶段

Code (源码)

需要对该编程语言的语法、规则、原理了然于心。

熟练编写优雅的功能,深入理解该编程语言在业务使用上的优势和劣势

可以根据实际情况,选择合适的框架和程序来实现功能

能深入该编程语言的底层设计思想,理解该语言创造者的目的,能对该语言或相关框架提出相应的改进建议

Compile(编译)

理解编译原理,思考为什么源码需要通过编译

有哪些语言不需要编译即可运行,其存在的优势,以及和编译型语言的对比

深入认识该语言编译前后的代码对比,了解到为什么需要编译器,思考自己如何实现一个编译器

Runtime (运行)

清楚的知道,代码在运行时,上下文状态和数据

有哪些公共能力,代码在真正运行时,会遇到哪些问题,怎么去解决和捕获这些问题

以及思考为什么会出现这些问题,看看能否在Code层或者Compile层规避掉

思考:程序运行时,有哪些黑盒,需要去挖掘出这些黑盒的本质,才能提升性能和体验

基金净值期望计算公式

  • $\gamma$ 购买力期望系数
  • $∆\alpha$ 已经购买的净值 $-$ 当天收盘净值
  • $∆\beta$ 期望达到的净值 $-$ 当天收盘净值
  • $N$ 购买的份额数
  • $M$ 已购买的基金份额
  • $C$ 需要投入的资金
  • $p$ 购买时当天收盘净值
  1. 当$lim_{∆\beta \to 0}$时,$N$的值将趋于$\infty$,$C$ 也将趋于$\infty$
  2. 当$lim{\frac{∆\alpha}{∆\beta}\to 1}$时,$lim{\gamma \to 0}$,$C$ 将趋于 $0$

✅ 坚持低位定投,当$C$为负数时,将开始获得收益